BTLE development on a shoestring
How to build a minimal nRF51822 development environment
BTLE (Bluetooth low-energy) is all the rage in embedded development these days. However, there's a bit of an entry barrier: first, you have to select a suitable chip, and then, usually, you have to buy a dev kit with programmer, compiler, SDK, ... for something around $100 at least. That's not super expensive, but it's still more than most people are prepared to spend just to try something out.
So my personal quest for the past year or so has been to get entry costs down as far as possible, in terms of boards as well as development environment. I'd like to try and keep the entire board costs below $10 total (hard, but not impossible). I've first tried the route of designing a small Arduino clone, the ScroogeMote, with an nRF24L01+ generic RF module. This can be tricked into supporting a subset of BTLE, but competing with China on price is impossible, as I've quickly learned. You simply cannot beat Aliexpress (see below).
To get the cheapest boards, I'd like some kind of integrated solution: BTLE + microcontroller all-in-one. You can easily slap an Arduino on top of most other BTLE chips, but then you're looking at an additional $20 at least, so that's out of the question. This basically leaves two options: the CC2541 from Texas Instruments and the nRF51822 from Nordic Semiconductor. The TI chip has an integrated 8051 core, the Nordic one has an ARM Cortex-M0. Personally, I prefer the ARM architecture, plus the compiler is free (gcc). The 8051 has a reputation for being horrible to develop with, and the IAR compiler from TI is quite expensive. So Nordic it is.
At Aliexpress, you can get an nRF51822 on a small breakout board with all required passive components and a PCB antenna for about $7, probably even less if you buy them in volume. It doesn't get much cheaper than that, leaving only the development kit. These usually consist of a development board (chip plus a few LEDs, buttons, perhaps USB connection etc.) and a programmer. For Nordic, it's the Segger J-LINK programmer, which is either a standalone device in the older DKs or integrated on-board on the new ones. Don't get me wrong, the dev kit is still a pretty good deal, but if you need a lot of them or have really little money, they still are somewhat pricey to just get started.
So I've put together a setup which allows BTLE development using just a nRF51822 breakout board and a Bus Pirate (which most aspiring hardware hackers probably have floating around anyway). The SDK is freely available from the Nordic website, gcc is in the Ubuntu default repository and the softdevice (mini-OS for the SOC) is now part of the SDK.
Here's what I used to get started on Ubuntu 14.04. Your mileage may, of course, vary, but most of it should be pretty straightfoward (some paths will probably need to be adjusted). I'm also writing this down as a sort of documentation for myself, so the order of things may appear somewhat random :-)
- Get the Nordic nRF51 SDK from their developer site. For this tutorial, I've been using version 10.0.0. There is a newer version 11.0.0 available, however, that is basically a new SDK that also targets the nRF52 series, so I'll be sticking with the 10 series for now.
wget http://developer.nordicsemi.com/nRF5_SDK/nRF51_SDK_v10.x.x/nRF51_SDK_10.0.0_dc26b5e.zip unzip nRF51_SDK_10.0.0_dc26b5e.zip - Get the compiler & debugger. On Ubuntu 14.04, this is quite easy:
sudo apt-get install arm-none-eabi-gcc sudo apt-get install arm-none-eabi-gdb - Get a Bus Pirate and the SWD programming software. It was originally written for the MCHCK generic dev board, kudos to Christopher Mason for the nRF patches. I'll assume that you know how to make the Bus Pirate accessible from your user account. (Of course, you could also use something a little more advanced, such as OpenOCD, but the SWD support in OpenOCD still seems to be somewhat sketchy, and I haven't been able to get it to work with the Bus Pirate).
sudo apt-get install ruby-serialport git clone https://github.com/floe/programmer.git - Connect the Bus Pirate with the breakout board. This involves a total of 4 wires: GND, 3V3, SWCLK and SWDIO. Of course, the pinout depends on the specific breakout board you have. The required connections are shown in the table below, as well as the example pinout for the rather widespread Core51822 breakout board.
Note: Gabor Paller noticed in his project that some variants of the Core51822 breakout board have several GND pins which are not internally connected. If your board behaves flaky during upload, then tying the ground pins together may help.
Bus Pirate nRF51822 GND (brown) GND 3V3 (red) VCC MOSI (grey) SWDIO CLK (purple) SWCLK 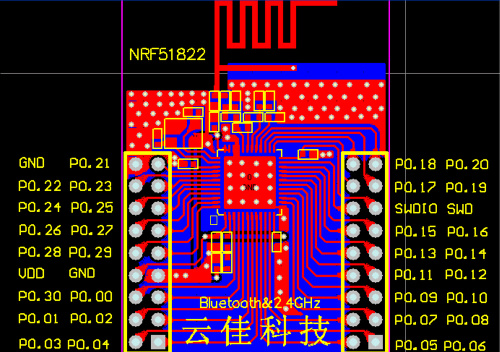
- Test the connection. If necessary, replace ttyUSB0 with the correct device node for your Bus Pirate.
This should produce a hexdump of the first 1000 words of the flash memory (probably all 0xFF for a virgin chip).
cd programmer ruby -I. nrf51.rb name=buspirate:dev=/dev/ttyUSB0 - So now we are set to compile something. First, we need to edit the makefile template to set the correct path to gcc:
Next, we select an example to build: the most simple one is blinky, which just blinks a couple of LEDs connected to GPIO 21-24 (based on the assumption that we're using a PCA10028 dev board - even if we're not, just connect an LED + resistor between GPIO 21 and VCC to see if it works). Before building the example, however, some more makefile tweaking is necessary:$EDITOR nrf51-sdk-10.0.0/components/toolchain/gcc/Makefile.posix # change to system path - line 1 should now be: # GNU_INSTALL_ROOT := /usr/cd nrf51-sdk-10.0.0/examples/peripherals/blinky/pca10028/blank/armgcc/ # search for nano.specs and remove that parameter - line 81 should now be: # LDFLAGS += -lc -lnosys sed -i -e 's/--specs=nano.specs //' makefile make - This should now create a directory
_buildcontaining a couple of bin/out/hex files. Before you flash them, however, it's worth mentioning that by default, the SDK assumes a chip variant with 32k RAM (xxac). The one I have on my breakout board has only 16k (xxaa). That's not a big issue in itself, but if you flash a binary for 32k on a chip with 16k, you will almost immediately get a HardFault, as the stack is allocated outside the existing memory range. Took me some time to figure this out - fortunately, the fix is quite easy: just edit the makefile and replace every occurence of xxac with xxaa.cd nrf51-sdk-10.0.0/examples/peripherals/blinky/pca10028/blank/armgcc/ # switch to chip variant with 16k RAM sed -i -e 's/xxac/xxaa/g' makefile make - Now it's time to flash the result - since we're not (yet) dealing with a softdevice, the code can simply be flashed to the start of flash memory at 0x00000000:
ruby -I. flash.rb name=buspirate:dev=/dev/ttyUSB0 nrf51422_xxaa.bin 0x00000000 - And you should have a blinking LED! This is a good time to check the debugger connection (note that you have to explicitly pass the ELF file to gdb). All the usual gdb commands (run, cont, break, print, x, info) should work as expected - for a good introduction to gdb, see here. Note that this is where the speed limit of the Bus Pirate shows, especially when single-stepping.
ruby -I. gdbserver.rb name=buspirate:dev=/dev/ttyUSB0 -- \ arm-none-eabi-gdb -readnow -ex 'target extended-remote :1234' nrf51422_xxaa.out - Next, we'll have a look at the softdevice. This is kind of a mini-OS for the SOC which (mostly) deals with all the hairy Bluetooth LE issues, radio calibration etc. etc. Since SDK 8, the softdevice is part of the SDK and you don't have to jump through any semi-legal hoops anymore to get it. In any case, I will assume that you have acquired
s110_nrf51_8.0.0_softdevice.hexby whatever means necessary (as long as it's just for experimentation/research, I would assume that no orbital lawyer strike is coming your way) and we can continue.cd nrf51-sdk-10.0.0/components/softdevice/s110/hex/ # convert to raw binary arm-none-eabi-objcopy -I ihex -O binary s110_nrf51_8.0.0_softdevice.hex s110_nrf51_8.0.0_softdevice.bin # flash to 0x00000000 ruby -I. flash.rb name=buspirate:dev=/dev/ttyUSB0 s110_nrf51_8.0.0_softdevice.bin 0x00000000 - Now that the softdevice is occupying the first 96k of flash memory, user programs have to play by slightly different rules: they now have to start at 0x00018000 (for softdevice S110 v8.0.0). For this to work, they a) have to be built with the makefiles from the "s110" directory (not "blank" as before), and b) have to be flashed to 0x00018000.
cd nrf51-sdk-10.0.0/examples/peripherals/blinky/pca10028/s110/armgcc/ sed -i -e 's/--specs=nano.specs //' makefile sed -i -e 's/xxac/xxaa/g' makefile make ruby -I. flash.rb name=buspirate:dev=/dev/ttyUSB0 nrf51422_xxaa.bin 0x00018000 - If your LED still blinks, you're good to go - now you can start with the more complex examples such as examples/ble_peripheral/ble_app_beacon (iBeacon clone). Extensive documentation can be found at the Nordic developer site. One final thing which is worth mentioning is that many of the cheap breakout boards will probably be missing a secondary 32 kHz clock source for cost reasons. According to a post on the Nordic forums, there is a workaround available if you call
SOFTDEVICE_HANDLER_INITwith a different parameter than the default:// Initialize the SoftDevice handler module. SOFTDEVICE_HANDLER_INIT(NRF_CLOCK_LFCLKSRC_SYNTH_250_PPM, false);